The information in this document has been superseded by GCM Server and GCM Client. Please use the GoogleCloudMessaging API instead of the GCM client helper library. The GCM server helper library is still valid.
Quickview
- Build and run the GCM demo app.
- Understand how to set up both the client and server sides of a GCM app.
- Become familiar with the GCM helper libraries.
In this document
Note: This tutorial describes how to develop GCM-enabled apps using the helper libraries. This is just one approach. For a more comprehensive discussion of the available APIs and development paths, see Getting Started.
The Google Cloud Messaging (GCM) Demo demonstrates how to use the Google Cloud Messaging framework in your Android application. This tutorial walks you through setting up and running the demo.
This demo consists of the following pieces:
- A web server containing a page where you can send messages.
- An Android application that receives and displays such messages.
See the reference for the client and server helper libraries used in this demo.
The sections below describe how to download the demo code and helper libraries from the SDK Manager. The demo code and helper libraries are also available at the open source site.
Requirements
For the web server:
- Ant 1.8 (it might work with earlier versions, but it's not guaranteed).
- One of the following:
- A running web server compatible with Servlets API version 2.5, such as Tomcat 6 or Jetty, or
- Java App Engine SDK version 1.6 or later.
- A Google account registered to use GCM.
- The API key for that account.
For the Android application:
- Emulator (or device) running Android 2.2 with Google APIs.
- The Google API project number of the account registered to use GCM.
Setting Up GCM
Before proceeding with the server and client setup, it's necessary to register a Google account with the Google API Console, enable Google Cloud Messaging in GCM, and obtain an API key from the Google API Console.
For instructions on how to set up GCM, see Getting Started.
Setting Up the Server
This section describes the different options for setting up a server.
Using a standard web server
To set up the server using a standard, servlet-compliant web server:
- From the SDK Manager, install Extras > Google Cloud Messaging for Android Library.
This creates a
gcmdirectory underYOUR_SDK_ROOT/extras/google/containing these subdirectories:gcm-client,gcm-server,samples/gcm-demo-client,samples/gcm-demo-server, andsamples/gcm-demo-appengine.Note: If you don't see Extras > Google Cloud Messaging for Android Library in the SDK Manager, make sure you are running version 20 or higher. Be sure to restart the SDK Manager after updating it.
- In a text editor, edit the
samples/gcm-demo-server/WebContent/WEB-INF/classes/api.keyand replace the existing text with the API key obtained above. - In a shell window, go to the
samples/gcm-demo-serverdirectory. - Generate the server's WAR file by running
ant war: - Deploy the
dist/gcm-demo.warto your running server. For instance, if you're using Jetty, copygcm-demo.warto thewebappsdirectory of the Jetty installation. - Open the server's main page in a browser. The URL depends on the server you're using and your machine's IP address, but it will be something like
http://192.168.1.10:8080/gcm-demo/home, wheregcm-demois the application context and/homeis the path of the main servlet.
$ ant war

Buildfile:build.xml

init:
   [mkdir] Created dir: build/classes
   [mkdir] Created dir: dist

compile:
   [javac] Compiling 6 source files to build/classes

war:
     [war] Building war: dist/gcm-demo.war

BUILD SUCCESSFUL
Total time: 0 seconds
Note: You can get the IP by running ifconfig on Linux or MacOS, or ipconfig on Windows.
You server is now ready.
Using App Engine for Java
To set up the server using a standard App Engine for Java:
- From the SDK Manager, install Extras > Google Cloud Messaging for Android Library.
This creates a
gcmdirectory underYOUR_SDK_ROOT/extras/google/containing these subdirectories:gcm-client,gcm-server,samples/gcm-demo-client,samples/gcm-demo-server, andsamples/gcm-demo-appengine. - In a text editor, edit
samples/gcm-demo-appengine/src/com/google/android/gcm/demo/server/ApiKeyInitializer.javaand replace the existing text with the API key obtained above.Note: The API key value set in that class will be used just once to create a persistent entity on App Engine. If you deploy the application, you can use App Engine's
Datastore Viewerto change it later. - In a shell window, go to the
samples/gcm-demo-appenginedirectory. - Start the development App Engine server by
ant runserver, using the-Dsdk.dirto indicate the location of the App Engine SDK and-Dserver.hostto set your server's hostname or IP address: - Open the server's main page in a browser. The URL depends on the server you're using and your machine's IP address, but it will be something like
http://192.168.1.10:8080/home, where/homeis the path of the main servlet.
$ ant -Dsdk.dir=/opt/google/appengine-java-sdk runserver -Dserver.host=192.168.1.10
Buildfile: gcm-demo-appengine/build.xml

init:
    [mkdir] Created dir: gcm-demo-appengine/dist

copyjars:

compile:

datanucleusenhance:
  [enhance] DataNucleus Enhancer (version 1.1.4) : Enhancement of classes
  [enhance] DataNucleus Enhancer completed with success for 0 classes. Timings : input=28 ms, enhance=0 ms, total=28 ms. Consult the log for full details
  [enhance] DataNucleus Enhancer completed and no classes were enhanced. Consult the log for full details

runserver:
     [java] Jun 15, 2012 8:46:06 PM com.google.apphosting.utils.jetty.JettyLogger info
     [java] INFO: Logging to JettyLogger(null) via com.google.apphosting.utils.jetty.JettyLogger
     [java] Jun 15, 2012 8:46:06 PM com.google.apphosting.utils.config.AppEngineWebXmlReader readAppEngineWebXml
     [java] INFO: Successfully processed gcm-demo-appengine/WebContent/WEB-INF/appengine-web.xml
     [java] Jun 15, 2012 8:46:06 PM com.google.apphosting.utils.config.AbstractConfigXmlReader readConfigXml
     [java] INFO: Successfully processed gcm-demo-appengine/WebContent/WEB-INF/web.xml
     [java] Jun 15, 2012 8:46:09 PM com.google.android.gcm.demo.server.ApiKeyInitializer contextInitialized
     [java] SEVERE: Created fake key. Please go to App Engine admin console, change its value to your API Key (the entity type is 'Settings' and its field to be changed is 'ApiKey'), then restart the server!
     [java] Jun 15, 2012 8:46:09 PM com.google.appengine.tools.development.DevAppServerImpl start
     [java] INFO: The server is running at http://192.168.1.10:8080/
     [java] Jun 15, 2012 8:46:09 PM com.google.appengine.tools.development.DevAppServerImpl start
     [java] INFO: The admin console is running at http://192.168.1.10:8080/_ah/admin
Note: You can get the IP by running ifconfig on Linux or MacOS, or ipconfig on Windows.
You server is now ready.
Setting Up the Device
To set up the device:
- From the SDK Manager, install Extras > Google Cloud Messaging for Android Library.
This creates a
gcmdirectory underYOUR_SDK_ROOT/extras/googlecontaining these subdirectories:gcm-client,gcm-server,samples/gcm-demo-client,samples/gcm-demo-server, andsamples/gcm-demo-appengine. - Using a text editor, open
samples/gcm-demo-client/src/com/google/android/gcm/demo/app/CommonUtilities.javaand set the proper values for theSENDER_IDandSERVER_URLconstants. For example: - In a shell window, go to the
gcm-demo-clientdirectory. - Use the SDK's
androidtool to generate theantbuild files: - Use
antto build the application's APK file: - Start the Android emulator:
- Make sure there is a Google account added to the emulator. It doesn't have to be any account (like the
senderId) in particular. - Install the application in the emulator:
- In the emulator, launch the GCM Demo app. The initial screen should look like this:
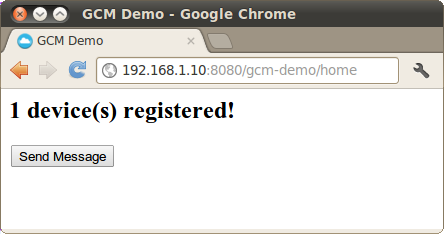
- Now go back to your browser and refresh the page. It will show that there is one device registered:
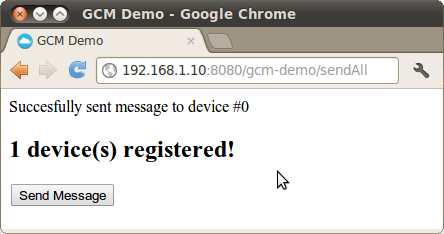
- Click on Send Message. The browser should show:
static final String SERVER_URL = "http://192.168.1.10:8080/gcm-demo";
static final String SENDER_ID = "4815162342";
Note that the SERVER_URL is the URL for the server and the application's context (or just server, if you are using App Engine), and it does not include the forward slash (/). Also note that SENDER_ID is the Google API project number you obtained in the server setup steps above.
$ android update project --name GCMDemo -p . --target android-16
Updated project.properties
Updated local.properties
Updated file ./build.xml
Updated file ./proguard-project.txt
If this command fails becase android-16 is not recognized, try a different target (as long as it is at least android-15).
$ ant clean debug
Buildfile: build.xml

...


-do-debug:
[zipalign] Running zip align on final apk...
    [echo] Debug Package: bin/GCMDemo-debug.apk
[propertyfile] Creating new property file: bin/build.prop
[propertyfile] Updating property file: bin/build.prop
[propertyfile] Updating property file: bin/build.prop
[propertyfile] Updating property file: bin/build.prop

-post-build:

debug:

BUILD SUCCESSFUL
Total time: 3 seconds
$emulator -avd my_avd
This example assumes there is an AVD (Android Virtual Device) named my_avd previously configured with Android 2.2 and Google APIs level 8. For more information on how to run an Android emulator, see Managing Virtual Devices in the Android Developers Guide.
If the emulator is running Android 4.0.4 or later, this step is optional as GCM does not require an account from this version on.
$ ant installd
Buildfile: gcm-demo-client/build.xml

-set-mode-check:

-set-debug-files:

install:
     [echo] Installing gcm-demo-client/bin/GCMDemo-debug.apk onto default emulator or device...
     [exec] 1719 KB/s (47158 bytes in 0.026s)
     [exec]   pkg: /data/local/tmp/GCMDemo-debug.apk
     [exec] Success

installd:

BUILD SUCCESSFUL
Total time: 3 seconds
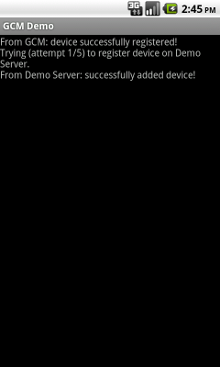
Note: What happened? When the device received a registration callback intent from GCM, it contacted the server to register itself, using the register servlet and passing the registration ID received from GCM; the server then saved the registration ID to use it to send messages to the phone.
And in your emulator:
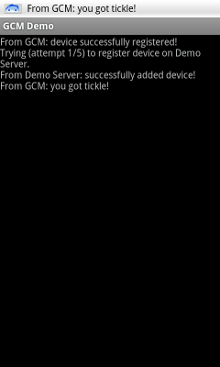
Note: What happened? When you clicked the button, the web server sent a message to GCM addressed to your device (more specifically, to the registration ID returned by GCM during the registration step). The device then received the message and displayed in the main activity; it also issued a system notification so the user would be notified even if the demo application was not running.