The sections below guide you through the process of setting up a GCM
implementation.
Before you start, make sure to set up
the Google Play Services SDK. You need this SDK to use the GoogleCloudMessaging methods.
Note that a full GCM implementation requires a server-side implementation, in addition to the client implementation in your app. This document offers a complete example that includes both the client and server.
Creating a Google API project
To create a Google API project:
- Open the Google APIs Console page.
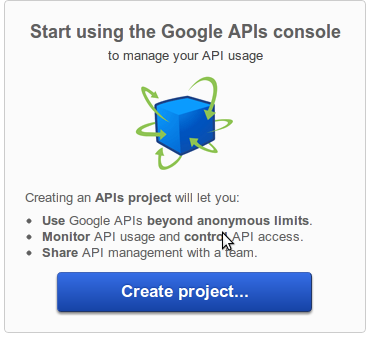
- If you haven't created an API project yet, this page will prompt you to do so:
Note: If you already have existing projects, the first page you see will be the Dashboard page. From there you can create a new project by opening the project drop-down menu (upper left corner) and choosing Other projects > Create.
- Click Create project. Your browser URL will change to something like:
- Take note of the value after
#project:(4815162342 in this example). This is your project number, and it will be used later on as the GCM sender ID.
https://code.google.com/apis/console/#project:4815162342
Enabling the GCM Service
To enable the GCM service:
- In the main Google APIs Console page, select Services.
- Turn the Google Cloud Messaging toggle to ON.
- In the Terms of Service page, accept the terms.
Obtaining an API Key
To obtain an API key:
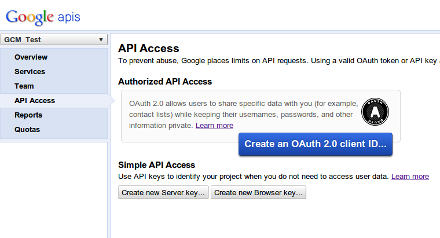
- In the main Google APIs Console page, select API Access. You will see a screen that resembles the following:
- Click Create new Server key. Either a server key or a browser key should work. The advantage to using a server key is that it allows you to whitelist IP addresses. The following screen appears:
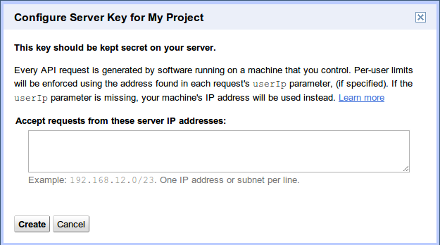
- Click Create:
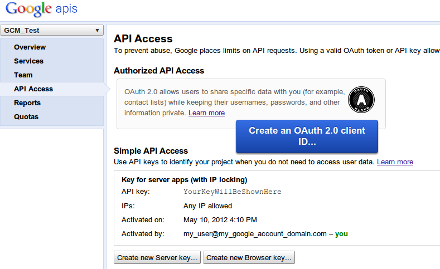
Take note of the API key value (YourKeyWillBeShownHere) in this example, as it will be used later on.
Note: If you need to rotate the key, click Generate new key. A new key will be created while the old one will still be active for up to 24 hours. If you want to get rid of the old key immediately (for example, if you feel it was compromised), click Delete key.
The following sections walk you through the steps of creating client and server-side code.
Writing a Client App
This section walks you through the steps involved in writing a client-side application—that is, the GCM-enabled application that runs on an Android device. This client sample is designed to work in conjunction with the server code shown in Writing the Server Code, below.
Step 1: Edit Your App's Manifest
- The
com.google.android.c2dm.permission.RECEIVEpermission so the Android application can register and receive messages. - The
android.permission.INTERNETpermission so the Android application can send the registration ID to the 3rd party server. - The
android.permission.GET_ACCOUNTSpermission as GCM requires a Google account (necessary only if if the device is running a version lower than Android 4.0.4) - The
android.permission.WAKE_LOCKpermission so the application can keep the processor from sleeping when a message is received. Optional—use only if the app wants to keep the device from sleeping. - An
applicationPackage + ".permission.C2D_MESSAGE"permission to prevent other Android applications from registering and receiving the Android application's messages. The permission name must exactly match this pattern—otherwise the Android application will not receive the messages. - A receiver for
com.google.android.c2dm.intent.RECEIVE, with the category set asapplicationPackage. The receiver should require thecom.google.android.c2dm.SENDpermission, so that only the GCM Framework can send a message to it. Note that the receiving of messages is implemented as an intent. - An intent service to handle the intents received by the broadcast receiver. Optional.
- If the GCM feature is critical to the Android application's function, be sure to
set
android:minSdkVersion="8"in the manifest. This ensures that the Android application cannot be installed in an environment in which it could not run properly.
Here are excerpts from a manifest that supports GCM:
<manifest package="com.example.gcm" ...>

    <uses-sdk android:minSdkVersion="8" android:targetSdkVersion="17"/>
    <uses-permission android:name="android.permission.INTERNET" />
    <uses-permission android:name="android.permission.GET_ACCOUNTS" />
    <uses-permission android:name="android.permission.WAKE_LOCK" />
    <uses-permission android:name="com.google.android.c2dm.permission.RECEIVE" />

    <permission android:name="com.example.gcm.permission.C2D_MESSAGE"
        android:protectionLevel="signature" />
    <uses-permission android:name="com.example.gcm.permission.C2D_MESSAGE" />

    <application ...>
        <receiver
            android:name=".MyBroadcastReceiver"
            android:permission="com.google.android.c2dm.permission.SEND" >
            <intent-filter>
                <action android:name="com.google.android.c2dm.intent.RECEIVE" />
                <category android:name="com.example.gcm" />
            </intent-filter>
        </receiver>
        <service android:name=".MyIntentService" />
    </application>

</manifest>
Step 2: Register for GCM
An Android application running on a mobile device registers to receive messages by calling
the GoogleCloudMessaging method
register(senderID...).
This method registers the application for GCM and returns the registration ID. This streamlined approach replaces the previous
GCM registration process. See the example below for details.
Step 3: Write Your Application
Finally, write your application. GCM offers a variety of ways to get the job done:
- For your messaging server, you can either use the new GCM Cloud Connection Server (CCS), the older GCM HTTP server, or both in tandem. For more discussion, see see GCM Server.
- To write your client application (that is, the GCM-enabled app that runs on an Android device), use the
GoogleCloudMessagingAPIs as shown below. Don't forget to set up your project to use the Google Play services SDK as described in Setup Google Play Services SDK.
Example
Here is a sample client application that illustrates how to use the GoogleCloudMessaging APIs. The sample consists of a main activity (DemoActivity) and a broadcast receiver (GcmBroadcastReceiver). You can use this client sample code in conjunction with the server code shown in Writing the Server Code.
Note the following:
- The sample primarily illustrates two things: registration, and upstream messaging. Upstream messaging only applies to apps that are running against a CCS server; HTTP-based servers don't support upstream messaging.
- The
GoogleCloudMessagingregistration APIs replace the old registration process, which was based on the now-obsolete client helper library. While the old registration process still works, we encourage you to use the newerGoogleCloudMessagingregistration APIs, regardless of your underlying server.
Registering
An Android application needs to register with GCM servers before it can receive messages. So in its onCreate() method, DemoActivity checks to see whether the app is registered with GCM and with the server:
/**
 * Main UI for the demo app.
 */
public class DemoActivity extends Activity {

    public static final String EXTRA_MESSAGE = "message";
    public static final String PROPERTY_REG_ID = "registration_id";
    private static final String PROPERTY_APP_VERSION = "appVersion";
    private static final String PROPERTY_ON_SERVER_EXPIRATION_TIME =
            "onServerExpirationTimeMs";
    /**
     * Default lifespan (7 days) of a reservation until it is considered expired.
     */
    public static final long REGISTRATION_EXPIRY_TIME_MS = 1000 * 3600 * 24 * 7;

    /**
     * Substitute you own sender ID here.
     */
    String SENDER_ID = "Your-Sender-ID";

    /**
     * Tag used on log messages.
     */
    static final String TAG = "GCMDemo";

    TextView mDisplay;
    GoogleCloudMessaging gcm;
    AtomicInteger msgId = new AtomicInteger();
    SharedPreferences prefs;
    Context context;

    String regid;

    @Override
    public void onCreate(Bundle savedInstanceState) {
        super.onCreate(savedInstanceState);

        setContentView(R.layout.main);
        mDisplay = (TextView) findViewById(R.id.display);

        context = getApplicationContext();
        regid = getRegistrationId(context);

        if (regid.length() == 0) {
            registerBackground();
        }
        gcm = GoogleCloudMessaging.getInstance(this);
    }
...
}
The app calls getRegistrationId() to see whether there is an existing registration ID stored in shared preferences:
/**
 * Gets the current registration id for application on GCM service.
 * <p>
 * If result is empty, the registration has failed.
 *
 * @return registration id, or empty string if the registration is not
 *         complete.
 */
private String getRegistrationId(Context context) {
    final SharedPreferences prefs = getGCMPreferences(context);
    String registrationId = prefs.getString(PROPERTY_REG_ID, "");
    if (registrationId.length() == 0) {
        Log.v(TAG, "Registration not found.");
        return "";
    }
    // check if app was updated; if so, it must clear registration id to
    // avoid a race condition if GCM sends a message
    int registeredVersion = prefs.getInt(PROPERTY_APP_VERSION, Integer.MIN_VALUE);
    int currentVersion = getAppVersion(context);
    if (registeredVersion != currentVersion || isRegistrationExpired()) {
        Log.v(TAG, "App version changed or registration expired.");
        return "";
    }
    return registrationId;
}

...

/**
 * @return Application's {@code SharedPreferences}.
 */
private SharedPreferences getGCMPreferences(Context context) {
    return getSharedPreferences(DemoActivity.class.getSimpleName(),
            Context.MODE_PRIVATE);
}
If the registration ID doesn't exist, or the app was updated, or the registration ID has expired, getRegistrationId() returns an empty string to indicate that the app needs to get a new regID. getRegistrationId() calls the following methods to check the app version and whether the regID has expired:
/**
 * @return Application's version code from the {@code PackageManager}.
 */
private static int getAppVersion(Context context) {
    try {
        PackageInfo packageInfo = context.getPackageManager()
                .getPackageInfo(context.getPackageName(), 0);
        return packageInfo.versionCode;
    } catch (NameNotFoundException e) {
        // should never happen
        throw new RuntimeException("Could not get package name: " + e);
    }
}

/**
 * Checks if the registration has expired.
 *
 * <p>To avoid the scenario where the device sends the registration to the
 * server but the server loses it, the app developer may choose to re-register
 * after REGISTRATION_EXPIRY_TIME_MS.
 *
 * @return true if the registration has expired.
 */
private boolean isRegistrationExpired() {
    final SharedPreferences prefs = getGCMPreferences(context);
    // checks if the information is not stale
    long expirationTime =
            prefs.getLong(PROPERTY_ON_SERVER_EXPIRATION_TIME, -1);
    return System.currentTimeMillis() > expirationTime;
}
If there isn't a valid existing registration ID, DemoActivity calls the following registerBackground() method to register. Note that because GCM methods are blocking, this has to take place on a background thread. This sample uses AsyncTask to accomplish this:
/**
 * Registers the application with GCM servers asynchronously.
 * <p>
 * Stores the registration id, app versionCode, and expiration time in the
 * application's shared preferences.
 */
private void registerBackground() {
    new AsyncTask() {
        @Override
        protected String doInBackground(Void... params) {
            String msg = "";
            try {
                if (gcm == null) {
                    gcm = GoogleCloudMessaging.getInstance(context);
                }
                regid = gcm.register(SENDER_ID);
                msg = "Device registered, registration id=" + regid;

                // You should send the registration ID to your server over HTTP,
                // so it can use GCM/HTTP or CCS to send messages to your app.

                // For this demo: we don't need to send it because the device
                // will send upstream messages to a server that echo back the message
                // using the 'from' address in the message.

                // Save the regid - no need to register again.
                setRegistrationId(context, regid);
            } catch (IOException ex) {
                msg = "Error :" + ex.getMessage();
            }
            return msg;
        }

        @Override
        protected void onPostExecute(String msg) {
            mDisplay.append(msg + "\n");
        }
    }.execute(null, null, null);
}
After registering, the app calls setRegistrationId() to store the registration ID in shared preferences for future use:
/**
 * Stores the registration id, app versionCode, and expiration time in the
 * application's {@code SharedPreferences}.
 *
 * @param context application's context.
 * @param regId registration id
 */
private void setRegistrationId(Context context, String regId) {
    final SharedPreferences prefs = getGCMPreferences(context);
    int appVersion = getAppVersion(context);
    Log.v(TAG, "Saving regId on app version " + appVersion);
    SharedPreferences.Editor editor = prefs.edit();
    editor.putString(PROPERTY_REG_ID, regId);
    editor.putInt(PROPERTY_APP_VERSION, appVersion);
    long expirationTime = System.currentTimeMillis() + REGISTRATION_EXPIRY_TIME_MS;

    Log.v(TAG, "Setting registration expiry time to " +
            new Timestamp(expirationTime));
    editor.putLong(PROPERTY_ON_SERVER_EXPIRATION_TIME, expirationTime);
    editor.commit();
}
Sending a message
When the user clicks the app's Send button, the app sends an upstream message using the new GoogleCloudMessaging APIs. In order to receive the upstream message, your server should be connected to CCS. You can use the code shown in Writing the Server Code as a sample XMPP client to connect to CCS.
public void onClick(final View view) {
    if (view == findViewById(R.id.send)) {
        new AsyncTask() {
            @Override
            protected String doInBackground(Void... params) {
                String msg = "";
                try {
                    Bundle data = new Bundle();
                    data.putString("hello", "World");
                    String id = Integer.toString(msgId.incrementAndGet());
                    gcm.send(SENDER_ID + "@gcm.googleapis.com", id, data);
                    msg = "Sent message";
                } catch (IOException ex) {
                    msg = "Error :" + ex.getMessage();
                }
                return msg;
            }

            @Override
            protected void onPostExecute(String msg) {
                mDisplay.append(msg + "\n");
            }
        }.execute(null, null, null);
    } else if (view == findViewById(R.id.clear)) {
        mDisplay.setText("");
    }
}
As described above in Step 1, the app includes a broadcast receiver for the com.google.android.c2dm.intent.RECEIVE intent. This is the mechanism GCM uses to deliver messages. When onClick() calls gcm.send(), it triggers the broadcast receiver's onReceive() method, which has the responsibility of handling the GCM message. In this sample the receiver's onReceive() method calls sendNotification() to put the message into a notification:
/**
 * Handling of GCM messages.
 */
public class GcmBroadcastReceiver extends BroadcastReceiver {
    static final String TAG = "GCMDemo";
    public static final int NOTIFICATION_ID = 1;
    private NotificationManager mNotificationManager;
    NotificationCompat.Builder builder;
    Context ctx;
    @Override
    public void onReceive(Context context, Intent intent) {
        GoogleCloudMessaging gcm = GoogleCloudMessaging.getInstance(context);
        ctx = context;
        String messageType = gcm.getMessageType(intent);
        if (GoogleCloudMessaging.MESSAGE_TYPE_SEND_ERROR.equals(messageType)) {
            sendNotification("Send error: " + intent.getExtras().toString());
        } else if (GoogleCloudMessaging.MESSAGE_TYPE_DELETED.equals(messageType)) {
            sendNotification("Deleted messages on server: " +
                    intent.getExtras().toString());
        } else {
            sendNotification("Received: " + intent.getExtras().toString());
        }
        setResultCode(Activity.RESULT_OK);
    }

    // Put the GCM message into a notification and post it.
    private void sendNotification(String msg) {
        mNotificationManager = (NotificationManager)
                ctx.getSystemService(Context.NOTIFICATION_SERVICE);

        PendingIntent contentIntent = PendingIntent.getActivity(ctx, 0,
                new Intent(ctx, DemoActivity.class), 0);

        NotificationCompat.Builder mBuilder =
                new NotificationCompat.Builder(ctx)
        .setSmallIcon(R.drawable.ic_stat_gcm)
        .setContentTitle("GCM Notification")
        .setStyle(new NotificationCompat.BigTextStyle()
        .bigText(msg))
        .setContentText(msg);

        mBuilder.setContentIntent(contentIntent);
        mNotificationManager.notify(NOTIFICATION_ID, mBuilder.build());
    }
}
Writing the Server Code
Here is an example of a CCS server written in Python. You can use this in conjunction with the sample client code shown above. This sample echo server sends an initial message, and for every upstream message received, it sends a dummy response back to the application that sent the upstream message. This example illustrates how to connect, send, and receive GCM messages using XMPP. It shouldn't be used as-is on a production deployment. For examples of HTTP-based servers, see GCM Server.
#!/usr/bin/python
import sys, json, xmpp, random, string

SERVER = 'gcm.googleapis.com'
PORT = 5235
USERNAME = ''
PASSWORD = ''
REGISTRATION_ID = ''

unacked_messages_quota = 1000
send_queue = []

# Return a random alphanumerical id
def random_id():
  rid = ''
  for x in range(8): rid += random.choice(string.ascii_letters + string.digits)
  return rid

def message_callback(session, message):
  global unacked_messages_quota
  gcm = message.getTags('gcm')
  if gcm:
    gcm_json = gcm[0].getData()
    msg = json.loads(gcm_json)
    if not msg.has_key('message_type'):
      # Acknowledge the incoming message immediately.
      send({'to': msg['from'],
            'message_type': 'ack',
            'message_id': msg['message_id']})
      # Queue a response back to the server.
      if msg.has_key('from'):
        # Send a dummy echo response back to the app that sent the upstream message.
        send_queue.append({'to': msg['from'],
                           'message_id': random_id(),
                           'data': {'pong': 1}})
    elif msg['message_type'] == 'ack' or msg['message_type'] == 'nack':
      unacked_messages_quota += 1

def send(json_dict):
  template = ("<message><gcm xmlns='google:mobile:data'>{1}</gcm></message>")
  client.send(xmpp.protocol.Message(
      node=template.format(client.Bind.bound[0], json.dumps(json_dict))))

def flush_queued_messages():
  global unacked_messages_quota
  while len(send_queue) and unacked_messages_quota > 0:
    send(send_queue.pop(0))
    unacked_messages_quota -= 1

client = xmpp.Client('gcm.googleapis.com', debug=['socket'])
client.connect(server=(SERVER,PORT), secure=1, use_srv=False)
auth = client.auth(USERNAME, PASSWORD)
if not auth:
  print 'Authentication failed!'
  sys.exit(1)

client.RegisterHandler('message', message_callback)

send_queue.append({'to': REGISTRATION_ID,
                   'message_id': 'reg_id',
                   'data': {'message_destination': 'RegId',
                            'message_id': random_id()}})

while True:
  client.Process(1)
  flush_queued_messages()