In this document
See also
The Google Play Developer Console provides several tools that help you test your In-app Billing implementation:
- Test purchases, which let test account users make real purchase your published in-app items, but without any actual charges to the user accounts.
- Static billing responses from Google Play, for testing in early development
To test In-app Billing in an application you must install the application on an Android-powered device. You cannot use the Android emulator to test In-app Billing. The device you use for testing must run a standard version of the Android 1.6 or later platform (API level 4 or higher), and have the most current version of the Google Play application installed. If a device is not running the most current Google Play application, your application won't be able to send In-app Billing requests to Google Play. For general information about how to set up a device for use in developing Android applications, see Using Hardware Devices.
Testing In-app Purchases
When your In-app Billing implementation is ready, you can test purchasing of your in-app SKUs in two ways:
- Test purchases, which let your selected license test users purchase your in-app products before the app is published, but without any resulting charges to the user, and
- Real purchases, which let regular users make real purchases of your in-app products with actual charges to the user’s payment instruments. In this case, you can use Google Play’s alpha and beta release groups to manage the users who can make “live” purchases using your implementation.
The sections below provide more detail about how to use these approaches for testing and validation.
Test Purchases (In-app Billing Sandbox)
Test purchases offer a secure, convenient way to enable larger-scale testing of your In-app Billing implementation during development or in preparation for launch. They let authorized user accounts make purchases of your in-app products through Google Play while the app is still unpublished, without incurring any actual charges to the user accounts.
Once authorized with testing access, those users can side-load your app and test the full merchandising, purchase, and fulfillment flow for your products. Test purchases are real orders and Google Play processes them in the same way as other orders. When purchases are complete, Google Play prevents the orders from going to financial processing, ensuring that there are no actual charges to user accounts, and automatically canceling the completed orders after 14 days.
Setting up test purchases
It’s easy to set up test purchases—any user account can be chosen to be a test account, and any user of a test account can make test purchases with any available payment method (even though there’s no charge to the payment method).
First, upload and publish in-app products that you want testers to be able to purchase. You can upload and publish in-app products in the Developer Console. Note that you can upload and publish your in-app items before you publish the APK itself. For example, you can publish your in-app items while your APK is still a draft.
Next, create license test accounts for authorized users. In the Developer Console, go to Settings > Account details, then in the License Testing section, add the addresses to Gmail accounts with testing status. For more information, see Setting Up for Test Purchases.
Once you’ve added the users as license tester accounts and saved the change, within 15 minutes those users can begin making test purchases of your in-app products. You can then distribute your app to your testers and provide a means of getting feedback.
Note: To make test purchases, the license test account must be on the user’s Android device. If the device has more than one account, the purchase will be made with the account that downloaded the app. If none of the accounts has downloaded the app, the purchase is made with the first account.Users can confirm the account that is making a purchase by expanding the purchase dialog.
Test purchases and developer account
Authorized license test accounts are associated with your developer account in Google Play, rather than with a specific APK or package name. Identifying an account as a test account enables it to purchase any of your in-app products without being charged.
Details of purchase flow
During a test purchase, users can test the actual merchandising, purchase, and fulfillment flow in your app. During purchase, the inapp item is displayed as a normal item with an actual price. However, Google Play marks test purchases with a notice across the center of the purchase dialog, for easy identification.
Cancelling completed test purchases
Google Play accumulates completed test purchases for each user but does not pass them on to financial processing. Over time, it automatically clears out the purchases by cancelling them.
In some cases, you might want to manually cancel a test purchase to continue testing. For cancelling purchases, you have these options:
- Wait for the transactions to expire—Google Play clears completed test purchases 14 days after their purchase date.
- Cancel purchases manually—you can go to the Google Wallet Merchant Center, look up the transaction, and then cancel it. You can find transactions by looking up their order numbers.
Requirements for using test purchases
If you plan to use test purchases, please note the requirements and limitations below:
- Test purchases is only supported for license test accounts when the app is using the In-app Billing v3 API.
- Test purchases are only supported for in-app products, not for in-app subscriptions.
Testing with real transactions
As you prepare to launch an app that uses In-app Billing, you can make use of Google Play alpha/beta release options to do validation and load testing on your implementation before distributing the app to all of your users.
With alpha/beta test groups, real users (chosen by you) can install your app from Google Play and test your in-app products. They can make real purchases that result in actual charges to their accounts, using any of their normal payment methods in Google Play to make purchases. Note that if you include test license accounts in your alpha and beta distribution groups, those users will only be able to make test purchases.
Testing with static responses
We recommend that you first test your In-app Billing implementation using static responses from Google Play. This enables you to verify that your application is handling the primary Google Play responses correctly and that your application is able to verify signatures correctly.
To test your implementation with static responses, you make an In-app Billing request using a special item that has a reserved product ID. Each reserved product ID returns a specific static response from Google Play. No money is transferred when you make In-app Billing requests with the reserved product IDs. Also, you cannot specify the form of payment when you make a billing request with a reserved product ID. Figure 1 shows the checkout flow for the reserved item that has the product ID android.test.purchased.
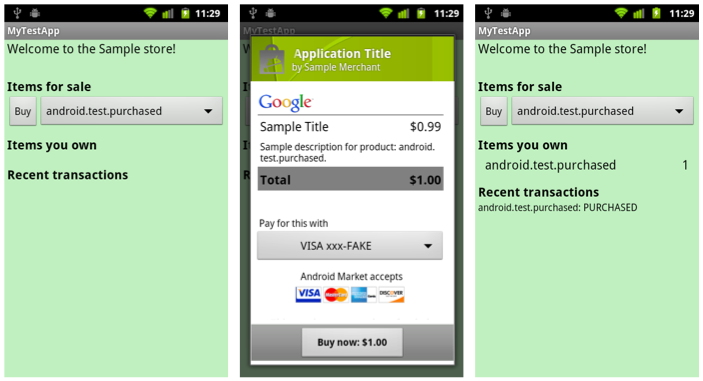
Figure 1.Wallet flow for the special reserved item android.test.purchased.
You do not need to list the reserved products in your application's product list. Google Play already knows about the reserved product IDs. Also, you do not need to upload your application to the Developer Console to perform static response tests with the reserved product IDs. You can simply install your application on a device, log into the device, and make billing requests using the reserved product IDs.
There are four reserved product IDs for testing static In-app Billing responses:
- android.test.purchased
When you make an In-app Billing request with this product ID, Google Play responds as though you successfully purchased an item. The response includes a JSON string, which contains fake purchase information (for example, a fake order ID). In some cases, the JSON string is signed and the response includes the signature so you can test your signature verification implementation using these responses.
- android.test.canceled
When you make an In-app Billing request with this product ID Google Play responds as though the purchase was canceled. This can occur when an error is encountered in the order process, such as an invalid credit card, or when you cancel a user's order before it is charged.
- android.test.refunded
When you make an In-app Billing request with this product ID, Google Play responds as though the purchase was refunded. Refunds cannot be initiated through Google Play's in-app billing service. Refunds must be initiated by you (the merchant). After you process a refund request through your Google Wallet merchant account, a refund message is sent to your application by Google Play. This occurs only when Google Play gets notification from Google Wallet that a refund has been made. For more information about refunds, see Handling IN_APP_NOTIFY messages and In-app Billing Pricing.
- android.test.item_unavailable
When you make an In-app Billing request with this product ID, Google Play responds as though the item being purchased was not listed in your application's product list.
In some cases, the reserved items may return signed static responses, which lets you test signature verification in your application. To test signature verification with the special reserved product IDs, you may need to set up test accounts or upload your application as a unpublished draft application. Table 1 shows you the conditions under which static responses are signed.
Table 1. Conditions under which static responses are signed.
| Application ever been published? | Draft application uploaded and unpublished? | User who is running the application | Static response signature |
|---|---|---|---|
| No | No | Any | Unsigned |
| No | No | Developer | Signed |
| Yes | No | Any | Unsigned |
| Yes | No | Developer | Signed |
| Yes | No | Test account | Signed |
| Yes | Yes | Any | Signed |
To make an In-app Billing request with a reserved product ID, you simply construct a normal
REQUEST_PURCHASE request, but instead of using a real product ID from your
application's product list you use one of the reserved product IDs.
To test your application using the reserved product IDs, follow these steps:
- Install your application on an Android-powered device.
You cannot use the emulator to test In-app Billing; you must install your application on a device to test In-app Billing.
To learn how to install an application on a device, see Running on a device.
- Sign in to your device with your developer account.
You do not need to use a test account if you are testing only with the reserved product IDs.
- Verify that your device is running a supported version of the Google Play
application or the MyApps application.
If your device is running Android 3.0, In-app Billing requires version 5.0.12 (or higher) of the MyApps application. If your device is running any other version of Android, In-app Billing requires version 2.3.4 (or higher) of the Google Play application. To learn how to check the version of the Google Play application, see Updating Google Play.
- Run your application and purchase the reserved product IDs.
Note: Making In-app Billing requests with the reserved product IDs overrides the usual Google Play production system. When you send an In-app Billing request for a reserved product ID, the quality of service will not be comparable to the production environment.
Setting Up for Test Purchases
After you finish your static response testing, and you verify that signature verification is working in your application, you can test your In-app Billing implementation by making actual in-app purchases. Testing real in-app purchases enables you to test the end-to-end In-app Billing experience, including the actual purchases from Google Play and the actual checkout flow that users will experience in your application.
Note: You do not need to publish your application to do end-to-end testing. You only need to upload your application as a draft application to perform end-to-end testing.
To test your In-app Billing implementation with actual in-app purchases, you will need to register at least one test account on the Google Play Developer Console. You cannot use your developer account to test the complete in-app purchase process because Google Wallet does not let you buy items from yourself. If you have not set up test accounts before, see Setting up test accounts.
Also, a test account can purchase an item in your product list only if the item is published. The application does not need to be published, but the item does need to be published.
To test your In-app Billing implementation with actual purchases, follow these steps:
- Upload your application as a draft application to the Developer Console.
You do not need to publish your application to perform end-to-end testing with real product IDs; you only need to upload your application as a draft application. However, you must sign your application with your release key before you upload it as a draft application. Also, the version number of the uploaded application must match the version number of the application you load to your device for testing. To learn how to upload an application to Google Play, see Uploading applications.
- Add items to the application's product list.
Make sure that you publish the items (the application can remain unpublished). See Creating a product list to learn how to do this.
- Install your application on an Android-powered device.
You cannot use the emulator to test In-app Billing; you must install your application on a device to test In-app Billing.
To learn how to install an application on a device, see Running on a device.
- Verify that your device is running a supported version of the Google Play
application or the MyApps application.
If your device is running Android 3.0, In-app Billing requires version 5.0.12 (or higher) of the MyApps application. If your device is running any other version of Android, In-app Billing requires version 2.3.4 (or higher) of the Google Play application. To learn how to check the version of the Google Play application, see Updating Google Play.
- Make in-app purchases in your application.
Note: The only way to change the primary account on a device is to do a factory reset, making sure you log on with your primary account first.
When you are finished testing your In-app Billing implementation, you are ready to publish your application on Google Play. You can follow the normal steps for preparing, signing, and publishing on Google Play.