If you're unfamiliar with the IntelliJ IDEA interface, you might be wondering how to accomplish some common tasks in Android Studio. This page provides some tips to help you get going.
For complete user documentation for the IntelliJ IDEA interface (upon which Android Studio is based), refer to the IntelliJ IDEA documentation.
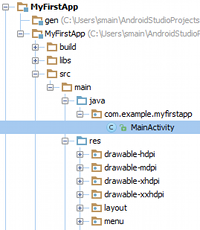
Figure 1. Gradle project structure
Project Structure
When you create a new project in Android Studio (or
migrate a project from Eclipse),
you'll notice that the project structure appears differently than you may be used to.
As shown in figure 1, almost all your project files are now inside the src/ directory,
including resources and the manifest file.
The new project structure is due to the switch to a Gradle-based build system. This structure
provides more flexibility to the build process and will allow multiple build variants (a feature not
yet fully implemented). Everything still behaves as you expect, but some of the files have moved
around. For the most part, you should need to modify only the files under the src/
directory. More information about the Gradle project structure is available in the
Gradle
Plugin User Guide.
Basic Operations
The following topics describe how to perform some basic development tasks with Android Studio.
Creating virtual devices
All the capabilities of the Android
Virtual Device Manager are accessible directly from
the Android Studio interface. Click the Android Virtual Device Manager
 in the toolbar to open it and create
new virtual devices for running your app in the emulator.
in the toolbar to open it and create
new virtual devices for running your app in the emulator.
Installing SDK updates
The SDK Manager
is also accessible to download new Android tools, platforms, and libraries
for your app. Click the SDK Manager
 in the toolbar to open it and check
for updates.
in the toolbar to open it and check
for updates.
Creating new files
You can quickly add new code and resource files by clicking the appropriate directory in the Project pane and pressing CTRL + N (CMD + N, on Mac). Based on the type of directory selected, Android Studio offers to create the appropriate file type.
For example, if you select a layout directory, press CTRL + N, and select
Layout resource file, a dialog opens so you can name the file (you can exclude
the .xml suffix) and choose a root view element. The editor then switches to the layout
design editor so you can begin designing your layout.
Creating layouts
Android Studio offers an advanced layout editor that allows you to drag-and-drop widgets into your layout and preview your layout while editing the XML.
While editing in the Text view, you can preview the layout on devices by opening the Preview pane available on the right side of the window. Within the Preview pane, you can modify the preview by changing various options at the top of the pane, including the preview device, layout theme, platform version and more. To preview the layout on multiple devices simultaneously, select Preview All Screen Sizes from the device drop-down.
You can switch to the graphical editor by clicking Design at the bottom of the window. While editing in the Design view, you can show and hide the widgets available to drag-and-drop by clicking Palette on the left side of the window. Clicking Designer on the right side of the window reveals a panel with a layout hierarchy and a list of properties for each view in the layout.
Debugging
When you build and run your app with Android Studio, you can view adb and device log messages (logcat) in the DDMS pane by clicking Android at the bottom of the window.
If you want to debug your app with the Android Debug Monitor, you can launch it by
clicking Monitor  in the toolbar. The Debug Monitor is where
you can find the complete set of DDMS
tools for profiling your app, controlling device
behaviors, and more. It also includes the Hierarchy Viewer tools to help
optimize your layouts.
in the toolbar. The Debug Monitor is where
you can find the complete set of DDMS
tools for profiling your app, controlling device
behaviors, and more. It also includes the Hierarchy Viewer tools to help
optimize your layouts.
Keyboard Commands
The following tables list keyboard shortcuts for common operations.
Note: If you're using Mac OS X, update your keymap to use the Mac OS X 10.5+ version keymaps under Android Studio > Preferences > Keymap.
Table 1. Programming key commands
| Action | Android Studio Key Command |
|---|---|
| Command look-up (autocomplete command name) | CTRL + SHIFT + A |
| Project quick fix | ALT + ENTER |
| Reformat code | CTRL + ALT + L (Win) OPTION + CMD + L (Mac) |
| Show docs for selected API | CTRL + Q (Win) F1 (Mac) |
| Show parameters for selected method | CTRL + P |
| Generate method | ALT + Insert (Win) CMD + N (Mac) |
| Jump to source | F4 (Win) CMD + down-arrow (Mac) |
| Delete line | CTRL + Y (Win) CMD + Backspace (Mac) |
| Search by symbol name | CTRL + ALT + SHIFT + N (Win) OPTION + CMD + O (Mac) |
Table 2. Project and editor key commands
| Action | Android Studio Key Command |
|---|---|
| Build | CTRL + F9 (Win) CMD + F9 (Mac) |
| Build and run | SHIFT + F10 (Win) CTRL + R (Mac) |
| Toggle project visibility | ALT + 1 (Win) CMD + 1 (Mac) |
| Navigate open tabs | ALT + left-arrow; ALT + right-arrow (Win) CTRL + left-arrow; CTRL + right-arrow (Mac) |
For a complete keymap reference guide, see the IntelliJ IDEA documentation.