Before installing the Android SDK, you must agree to the following terms and conditions.
Terms and Conditions
This is the Android Software Development Kit License Agreement
1. Introduction
1.1 The Android Software Development Kit (referred to in this License Agreement as the "SDK" and specifically including the Android system files, packaged APIs, and Google APIs add-ons) is licensed to you subject to the terms of this License Agreement. This License Agreement forms a legally binding contract between you and Google in relation to your use of the SDK.
1.2 "Android" means the Android software stack for devices, as made available under the Android Open Source Project, which is located at the following URL: http://source.android.com/, as updated from time to time.
1.3 "Google" means Google Inc., a Delaware corporation with principal place of business at 1600 Amphitheatre Parkway, Mountain View, CA 94043, United States.
2. Accepting this License Agreement
2.1 In order to use the SDK, you must first agree to this License Agreement. You may not use the SDK if you do not accept this License Agreement.
2.2 By clicking to accept, you hereby agree to the terms of this License Agreement.
2.3 You may not use the SDK and may not accept the License Agreement if you are a person barred from receiving the SDK under the laws of the United States or other countries including the country in which you are resident or from which you use the SDK.
2.4 If you are agreeing to be bound by this License Agreement on behalf of your employer or other entity, you represent and warrant that you have full legal authority to bind your employer or such entity to this License Agreement. If you do not have the requisite authority, you may not accept the License Agreement or use the SDK on behalf of your employer or other entity.
3. SDK License from Google
3.1 Subject to the terms of this License Agreement, Google grants you a limited, worldwide, royalty-free, non-assignable and non-exclusive license to use the SDK solely to develop applications to run on the Android platform.
3.2 You agree that Google or third parties own all legal right, title and interest in and to the SDK, including any Intellectual Property Rights that subsist in the SDK. "Intellectual Property Rights" means any and all rights under patent law, copyright law, trade secret law, trademark law, and any and all other proprietary rights. Google reserves all rights not expressly granted to you.
3.3 You may not use the SDK for any purpose not expressly permitted by this License Agreement. Except to the extent required by applicable third party licenses, you may not: (a) copy (except for backup purposes), modify, adapt, redistribute, decompile, reverse engineer, disassemble, or create derivative works of the SDK or any part of the SDK; or (b) load any part of the SDK onto a mobile handset or any other hardware device except a personal computer, combine any part of the SDK with other software, or distribute any software or device incorporating a part of the SDK.
3.4 You agree that you will not take any actions that may cause or result in the fragmentation of Android, including but not limited to distributing, participating in the creation of, or promoting in any way a software development kit derived from the SDK.
3.5 Use, reproduction and distribution of components of the SDK licensed under an open source software license are governed solely by the terms of that open source software license and not this License Agreement.
3.6 You agree that the form and nature of the SDK that Google provides may change without prior notice to you and that future versions of the SDK may be incompatible with applications developed on previous versions of the SDK. You agree that Google may stop (permanently or temporarily) providing the SDK (or any features within the SDK) to you or to users generally at Google's sole discretion, without prior notice to you.
3.7 Nothing in this License Agreement gives you a right to use any of Google's trade names, trademarks, service marks, logos, domain names, or other distinctive brand features.
3.8 You agree that you will not remove, obscure, or alter any proprietary rights notices (including copyright and trademark notices) that may be affixed to or contained within the SDK.
4. Use of the SDK by You
4.1 Google agrees that it obtains no right, title or interest from you (or your licensors) under this License Agreement in or to any software applications that you develop using the SDK, including any intellectual property rights that subsist in those applications.
4.2 You agree to use the SDK and write applications only for purposes that are permitted by (a) this License Agreement and (b) any applicable law, regulation or generally accepted practices or guidelines in the relevant jurisdictions (including any laws regarding the export of data or software to and from the United States or other relevant countries).
4.3 You agree that if you use the SDK to develop applications for general public users, you will protect the privacy and legal rights of those users. If the users provide you with user names, passwords, or other login information or personal information, you must make the users aware that the information will be available to your application, and you must provide legally adequate privacy notice and protection for those users. If your application stores personal or sensitive information provided by users, it must do so securely. If the user provides your application with Google Account information, your application may only use that information to access the user's Google Account when, and for the limited purposes for which, the user has given you permission to do so.
4.4 You agree that you will not engage in any activity with the SDK, including the development or distribution of an application, that interferes with, disrupts, damages, or accesses in an unauthorized manner the servers, networks, or other properties or services of any third party including, but not limited to, Google or any mobile communications carrier.
4.5 You agree that you are solely responsible for (and that Google has no responsibility to you or to any third party for) any data, content, or resources that you create, transmit or display through Android and/or applications for Android, and for the consequences of your actions (including any loss or damage which Google may suffer) by doing so.
4.6 You agree that you are solely responsible for (and that Google has no responsibility to you or to any third party for) any breach of your obligations under this License Agreement, any applicable third party contract or Terms of Service, or any applicable law or regulation, and for the consequences (including any loss or damage which Google or any third party may suffer) of any such breach.
5. Your Developer Credentials
5.1 You agree that you are responsible for maintaining the confidentiality of any developer credentials that may be issued to you by Google or which you may choose yourself and that you will be solely responsible for all applications that are developed under your developer credentials.
6. Privacy and Information
6.1 In order to continually innovate and improve the SDK, Google may collect certain usage statistics from the software including but not limited to a unique identifier, associated IP address, version number of the software, and information on which tools and/or services in the SDK are being used and how they are being used. Before any of this information is collected, the SDK will notify you and seek your consent. If you withhold consent, the information will not be collected.
6.2 The data collected is examined in the aggregate to improve the SDK and is maintained in accordance with Google's Privacy Policy.
7. Third Party Applications
7.1 If you use the SDK to run applications developed by a third party or that access data, content or resources provided by a third party, you agree that Google is not responsible for those applications, data, content, or resources. You understand that all data, content or resources which you may access through such third party applications are the sole responsibility of the person from which they originated and that Google is not liable for any loss or damage that you may experience as a result of the use or access of any of those third party applications, data, content, or resources.
7.2 You should be aware the data, content, and resources presented to you through such a third party application may be protected by intellectual property rights which are owned by the providers (or by other persons or companies on their behalf). You may not modify, rent, lease, loan, sell, distribute or create derivative works based on these data, content, or resources (either in whole or in part) unless you have been specifically given permission to do so by the relevant owners.
7.3 You acknowledge that your use of such third party applications, data, content, or resources may be subject to separate terms between you and the relevant third party. In that case, this License Agreement does not affect your legal relationship with these third parties.
8. Using Android APIs
8.1 Google Data APIs
8.1.1 If you use any API to retrieve data from Google, you acknowledge that the data may be protected by intellectual property rights which are owned by Google or those parties that provide the data (or by other persons or companies on their behalf). Your use of any such API may be subject to additional Terms of Service. You may not modify, rent, lease, loan, sell, distribute or create derivative works based on this data (either in whole or in part) unless allowed by the relevant Terms of Service.
8.1.2 If you use any API to retrieve a user's data from Google, you acknowledge and agree that you shall retrieve data only with the user's explicit consent and only when, and for the limited purposes for which, the user has given you permission to do so.
9. Terminating this License Agreement
9.1 This License Agreement will continue to apply until terminated by either you or Google as set out below.
9.2 If you want to terminate this License Agreement, you may do so by ceasing your use of the SDK and any relevant developer credentials.
9.3 Google may at any time, terminate this License Agreement with you if:
(A) you have breached any provision of this License Agreement; or
(B) Google is required to do so by law; or
(C) the partner with whom Google offered certain parts of SDK (such as APIs) to you has terminated its relationship with Google or ceased to offer certain parts of the SDK to you; or
(D) Google decides to no longer provide the SDK or certain parts of the SDK to users in the country in which you are resident or from which you use the service, or the provision of the SDK or certain SDK services to you by Google is, in Google's sole discretion, no longer commercially viable.
9.4 When this License Agreement comes to an end, all of the legal rights, obligations and liabilities that you and Google have benefited from, been subject to (or which have accrued over time whilst this License Agreement has been in force) or which are expressed to continue indefinitely, shall be unaffected by this cessation, and the provisions of paragraph 14.7 shall continue to apply to such rights, obligations and liabilities indefinitely.
10. DISCLAIMER OF WARRANTIES
10.1 YOU EXPRESSLY UNDERSTAND AND AGREE THAT YOUR USE OF THE SDK IS AT YOUR SOLE RISK AND THAT THE SDK IS PROVIDED "AS IS" AND "AS AVAILABLE" WITHOUT WARRANTY OF ANY KIND FROM GOOGLE.
10.2 YOUR USE OF THE SDK AND ANY MATERIAL DOWNLOADED OR OTHERWISE OBTAINED THROUGH THE USE OF THE SDK IS AT YOUR OWN DISCRETION AND RISK AND YOU ARE SOLELY RESPONSIBLE FOR ANY DAMAGE TO YOUR COMPUTER SYSTEM OR OTHER DEVICE OR LOSS OF DATA THAT RESULTS FROM SUCH USE.
10.3 GOOGLE FURTHER EXPRESSLY DISCLAIMS ALL WARRANTIES AND CONDITIONS OF ANY KIND, WHETHER EXPRESS OR IMPLIED, INCLUDING, BUT NOT LIMITED TO THE IMPLIED WARRANTIES AND CONDITIONS OF MERCHANTABILITY, FITNESS FOR A PARTICULAR PURPOSE AND NON-INFRINGEMENT.
11. LIMITATION OF LIABILITY
11.1 YOU EXPRESSLY UNDERSTAND AND AGREE THAT GOOGLE, ITS SUBSIDIARIES AND AFFILIATES, AND ITS LICENSORS SHALL NOT BE LIABLE TO YOU UNDER ANY THEORY OF LIABILITY FOR ANY DIRECT, INDIRECT, INCIDENTAL, SPECIAL, CONSEQUENTIAL OR EXEMPLARY DAMAGES THAT MAY BE INCURRED BY YOU, INCLUDING ANY LOSS OF DATA, WHETHER OR NOT GOOGLE OR ITS REPRESENTATIVES HAVE BEEN ADVISED OF OR SHOULD HAVE BEEN AWARE OF THE POSSIBILITY OF ANY SUCH LOSSES ARISING.
12. Indemnification
12.1 To the maximum extent permitted by law, you agree to defend, indemnify and hold harmless Google, its affiliates and their respective directors, officers, employees and agents from and against any and all claims, actions, suits or proceedings, as well as any and all losses, liabilities, damages, costs and expenses (including reasonable attorneys fees) arising out of or accruing from (a) your use of the SDK, (b) any application you develop on the SDK that infringes any copyright, trademark, trade secret, trade dress, patent or other intellectual property right of any person or defames any person or violates their rights of publicity or privacy, and (c) any non-compliance by you with this License Agreement.
13. Changes to the License Agreement
13.1 Google may make changes to the License Agreement as it distributes new versions of the SDK. When these changes are made, Google will make a new version of the License Agreement available on the website where the SDK is made available.
14. General Legal Terms
14.1 This License Agreement constitutes the whole legal agreement between you and Google and governs your use of the SDK (excluding any services which Google may provide to you under a separate written agreement), and completely replaces any prior agreements between you and Google in relation to the SDK.
14.2 You agree that if Google does not exercise or enforce any legal right or remedy which is contained in this License Agreement (or which Google has the benefit of under any applicable law), this will not be taken to be a formal waiver of Google's rights and that those rights or remedies will still be available to Google.
14.3 If any court of law, having the jurisdiction to decide on this matter, rules that any provision of this License Agreement is invalid, then that provision will be removed from this License Agreement without affecting the rest of this License Agreement. The remaining provisions of this License Agreement will continue to be valid and enforceable.
14.4 You acknowledge and agree that each member of the group of companies of which Google is the parent shall be third party beneficiaries to this License Agreement and that such other companies shall be entitled to directly enforce, and rely upon, any provision of this License Agreement that confers a benefit on (or rights in favor of) them. Other than this, no other person or company shall be third party beneficiaries to this License Agreement.
14.5 EXPORT RESTRICTIONS. THE SDK IS SUBJECT TO UNITED STATES EXPORT LAWS AND REGULATIONS. YOU MUST COMPLY WITH ALL DOMESTIC AND INTERNATIONAL EXPORT LAWS AND REGULATIONS THAT APPLY TO THE SDK. THESE LAWS INCLUDE RESTRICTIONS ON DESTINATIONS, END USERS AND END USE.
14.6 The rights granted in this License Agreement may not be assigned or transferred by either you or Google without the prior written approval of the other party. Neither you nor Google shall be permitted to delegate their responsibilities or obligations under this License Agreement without the prior written approval of the other party.
14.7 This License Agreement, and your relationship with Google under this License Agreement, shall be governed by the laws of the State of California without regard to its conflict of laws provisions. You and Google agree to submit to the exclusive jurisdiction of the courts located within the county of Santa Clara, California to resolve any legal matter arising from this License Agreement. Notwithstanding this, you agree that Google shall still be allowed to apply for injunctive remedies (or an equivalent type of urgent legal relief) in any jurisdiction.
November 13, 2012
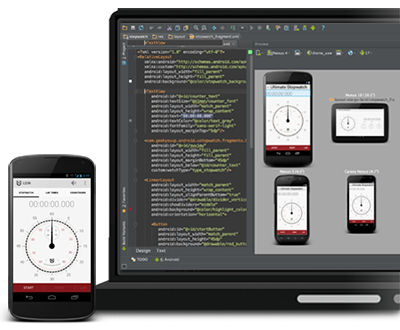
Android Studio is a new Android development environment based on IntelliJ
IDEA. Similar to Eclipse with the
ADT Plugin, Android Studio provides integrated Android developer tools
for development and debugging. On top of the
capabilities you expect from IntelliJ, Android Studio offers:
- Gradle-based build support.
- Android-specific refactoring and quick fixes.
- Lint tools to catch performance, usability, version compatibility and other problems.
- ProGuard and app-signing capabilities.
- Template-based wizards to create common Android designs and components.
- A rich layout editor that allows you to drag-and-drop UI components, preview layouts on
multiple screen configurations, and much more.
- Built-in support for Google Cloud Platform, making it easy to integrate Google Cloud
Messaging and App Engine as server-side components.
Caution: Android Studio is currently available as
an early access preview. Several features
are either incomplete or not yet implemented and you may encounter bugs. If you are not
comfortable using an unfinished product, you may want to instead
download (or continue to use) the
ADT Bundle (Eclipse with the ADT Plugin).
Updating from older versions
If you already have Android Studio installed, in most cases, you can upgrade to the latest
version by installing a patch. From within Android Studio, select
Help > Check for updates to see whether an update is available.
If an update is not available,
follow the installation instructions below and replace your existing
installation.
Caution: Replacing your existing installation of
Android Studio will remove any additional SDK packages you've installed, such as target
platforms, system images, and sample apps. To preserve these, copy them from your current
SDK directory under Android Studio to a temporary location
before installing the update. Then move them back once the update is complete.
If you fail to copy these packages, then you can instead download them again through
the Android SDK Manager.
Also note that due to the update to Android Gradle Plugin 0.6, you will encounter errors when opening
existing projects. See the Troubleshooting notes below for
information about how to resolve them.
Installing Android Studio
- Download the Android Studio package from above.
- Install Android Studio and the SDK tools:
Windows:
- Launch the downloaded EXE file,
android-studio-bundle-<version>.exe.
- Follow the setup wizard to install Android Studio.
Known issue:
On some Windows systems, the launcher script does not find where Java is installed.
If you encounter this problem,
you need to set an environment variable indicating the correct location.
Select Start menu > Computer > System Properties >
Advanced System Properties. Then open Advanced tab > Environment
Variables and add a new system variable JAVA_HOME that points to
your JDK folder, for example C:\Program Files\Java\jdk1.7.0_21.
Mac OS X:
- Open the downloaded DMG file,
android-studio-bundle-<version>.dmg.
- Drag and drop Android Studio into the Applications folder.
Known issue:
Depending on your security settings, when you attempt to open Android Studio, you might
see a warning that says the package is damaged and should be moved to the trash. If this
happens, go to System Preferences > Security & Privacy and under
Allow applications downloaded from, select Anywhere.
Then open Android Studio again.
Linux:
- Unpack the downloaded Tar file,
android-studio-bundle-<version>.tgz, into an appropriate
location for your applications.
- To launch Android Studio, navigate to the
android-studio/bin/ directory
in a terminal and execute studio.sh.
You may want to add android-studio/bin/ to your PATH environmental
variable so that you can start Android Studio from any directory.
That's it! You're ready to start developing apps with Android Studio.
Note: On Windows and Mac, the individual tools and
other SDK packages are saved within the Android Studio application directory.
To access the tools directly, use a terminal to navigate into the application and locate
the sdk/ directory. For example:
Windows: \Users\<user>\AppData\Local\Android\android-studio\sdk\
Mac: /Applications/Android\ Studio.app/sdk/
For a list of some known issues, see tools.android.com/knownissues.
Starting a Project
When you launch Android Studio for the first time, you'll see a Welcome
screen that offers several ways to get started:
- To start building a new app, click New Project.
This starts the New Project wizard, which helps you set up a project using an app template.
- To import an existing Android app project, click Import Project.
Note: If you previously developed your Android project
with Eclipse, you should first use the new export feature in the ADT plugin to prepare
your project with the new Gradle build system. For more information, read
Migrating from Eclipse.
For additional help using Android Studio, read Tips and Tricks.
As you continue developing apps, you may need to install additional versions
of Android for the emulator and other packages such as the Android Support Library.
To install more packages, use
the SDK Manager, which you can
open from Android Studio by clicking SDK Manager
 in the toolbar.
Revisions
 Android Studio v0.2.x (July 2013)
- Merged in the latest IntelliJ codebase changes. Includes fixes for issues reported by Studio users such as tweaks to Linux font sizes and font rendering.
- Android Gradle plug-in updated to 0.5.0.
Caution: This new version is not backwards compatible.
When opening a project that uses an older version of the plug-in, Studio will show an error
stating Gradle <project_name> project refresh failed. See Troubleshooting below for details.
The updated Gradle plug-in includes the following changes:
- Fixed IDE model to contain the output file even if it's customized through the DSL. Also
fixed the DSL to get/set the output file on the variant object so that it's not necessary to
use
variant.packageApplication or variant.zipAlign
- Fixed dependency resolution so that we resolved the combination of (default config,
build types, flavor(s)) together instead of separately.
- Fixed dependency for tests of library project to properly include all the dependencies
of the library itself.
- Fixed case where two dependencies have the same leaf name.
- Fixed issue where Proguard rules file cannot be applied on flavors.
All Gradle plugin release notes are available are here: http://tools.android.com/tech-docs/new-build-system.
- Gradle errors from aapt no longer point to merged output files in the build/ folder, they
point back to the real source locations.
- Parallel Builds. It's now possible to use Gradle's parallel builds. Please be aware that
parallel builds are in "incubation" (see Gradle's
documentation.) This feature is off by default. To enable it, go to
Preferences > Compiler and check the box Compile
independent modules in parallel.
- Further work on the new resource repository used for layout rendering, resource
folding in the editor, and more:
- Basic support for .aar library dependencies (e.g. using a library without a local copy of
the sources). Still not working for resource XML validation and navigation in source editors.
- Cycle detection in resource references.
- Quick Documentation (F1), which can show all translations of the string under the caret,
will now also show all resource overlays from the various Gradle flavors and build types, as
well as libraries. They are listed in reverse resource overlay order, with strikethrough on
the versions of the string that are masked.
- Fixes to handle updating the merged resources when the set of module dependencies
change.
- XML rendering fixes to properly handle character entity declarations and XML and unicode
escapes.
- Save screenshot support for the layout preview and layout editor windows.
- Template bug fixes.
- Lint bug fixes.
- Various fixes for crash reports. Thank you, and keep filing crash reports!
Android Studio v0.1.x (May 2013)
- Various bug fixes, including a fix for a common Windows installation issue.
Note: Periodic updates are pushed to Android Studio
without requiring you to update from here. To manually check for updates, select
Help > Check for updates (on Mac, select Android Studio >
Check for updates).
Troubleshooting
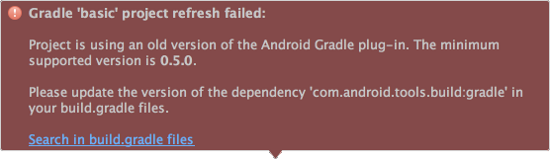
Error: Gradle project refresh failed
Android Studio 0.2.0 has updated the Gradle plug-in to 0.5.0, which is not backwards compatible.
When opening a project that uses an older version of the plug-in, Studio will display the error
shown in figure 1 in the upper right corner of the IDE.
To resolve the error, you must change the version of the Android Gradle plug-in to 0.5.0.
- Click the link in the error dialog Search in build.gradle files. If the dialog
is no longer visible, click Event Log
 in the bottom-right corner of the IDE,
then click Search in build.gradle files.
in the bottom-right corner of the IDE,
then click Search in build.gradle files.
- Double-click the line under the build.gradle usage. For example:
classpath 'com.android.tools.build:gradle:0.4. This opens the project
build.gradle file.
- Edit the
classpath to change the gradle version to 0.5.+.
For example:
dependencies {
  classpath 'com.android.tools.build:gradle:0.5.+'
}
- Save the file and rebuild your project.
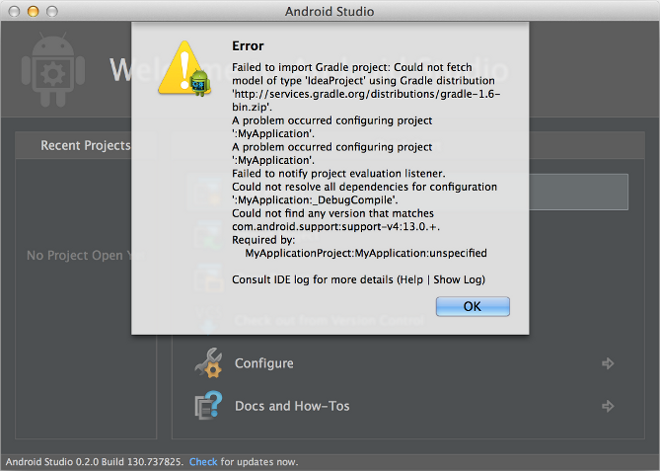
Error: Failed to import Gradle project
If, after updating to Android Studio 0.2.x and creating or opening a project, you receive an
error stating "Could not find any version that matches
com.android.support:support-v4:13.0.+", then you must install the Android Support
Repository. This was likely caused because you're pointing Android Studio to an external
Android SDK location that does not have the new Maven repository included with Android Studio
0.2.x. This new Maven repository is used by the new build system for the Support Library, instead
of using the Support Library JAR files, so must be present in the SDK.
- Open the Android SDK Manager.
- Expand the Extras directory
and install Android Support Repository.
If you've encountered other problems in Android Studio, look at the following page
for possible resolutions to known issues: http://tools.android.com/knownissues.
 Android Studio v0.3.1 (Oct 2013)